
V-Desk
But first things first... I made the whole thing about 5 years ago, when I was still living at my parents house. And had to make it so that the whole thing could fit in this tiny bedroom I had back then... 2 by 3,5 meters (Sorry folks, but in Holland we use the metric system.) So I nibbled a bit here and there to make it fit in there. Another thing that will complicate things now -without the rest of those schematics- is to know how big the MDF panels are in a store near you, and then figure out how to get the individual parts out of them in the most efficient way, as I did... Besides I always make some small alteration on the spot, because it doesn't quit fit right away. Alteration which of course weren’t on my original plans. The only printed copy's I DID had of those schematics were very beaten up from laying 'round the work floor, so they were trash material afterwards. BUT after some digging in a big pile of my old stuff, I did find this drawing of the "Desk" that's around the drawing table. It hadn't had the dimensions on it though... so I had to backtrack some steps. Hope you all can figure out the rest of the individual panels' dimensions from here... if you would like to make your own. (By the way… after a resent inquiry to someone I know, who has one of those original Disney D-Desk himself... I can tell you that I almost used the right dimension when I made mine. Only a couple of millimetres off)
Also know that the work surface itself is mounted on a simple tiltable (is that even a word?) drawing table I already had (so that too is kinda custom made to fit that particular table.) Hope yours is quiet the same 'cause it's not some kind of fancy contraption that is integrated in the big "Desk thing" (wanted though, but that would have taken even more time then it already did...)
As for the light-box... well that kinda is the work surface (one layer of it anyway.) As you can see, I can lay a lose board on top of this light-box, because it will rests on a strip of wood… and the separate boards have some aluminium strip at the back that hold it from sliding sideways (and incidentally keeps the board from curving up, because of the hole.)
Making the V-Desk I used some power tools like a electric jigsaw, drill, router, sander... But as far as materials goes I just used MDF (wood), some aluminium strips, more screws then I thought possible (so the whole thing is re-screw-able... also is that even a word?)... 6 grips and 4 hinges for the drawers and doors... A piece of tin foil, 3 TL-lamps, 2 switches and some cable for the light-box... 6 short table legs, with adjusting screw (so I still can vacuum under this piece of furniture and the floor will not be to damaged after a while.) And to finish it all off I gave every panel a good layer of transparent acrylic floorboard paint. So now everything is as hard as steel and easy to clean.
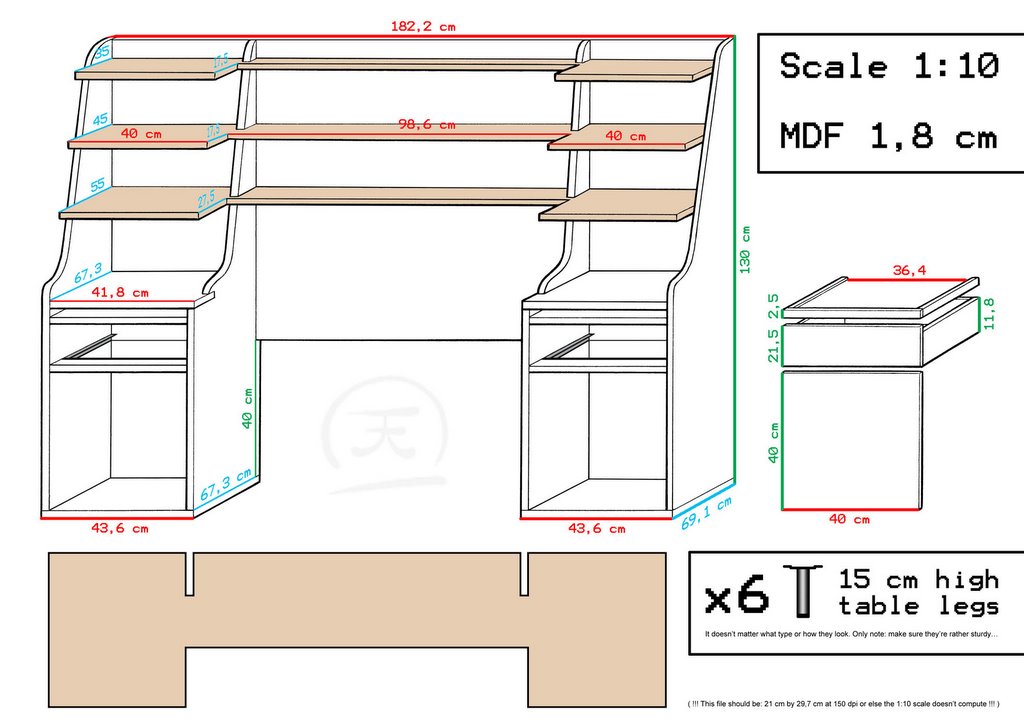

Edit: Blogger's max frame size is apparently 1024 pixels wide... bummer! ‘cause now the scale doesn’t compute. But if you want the correct version, you can always mail me though!
posted by Viktor Venema at 4:24 p.m.
![]()


1 Comments:
Woooow !! Man, I'm soooo impressed. This is fantastic !!!!
Een reactie posten
<< Home